Report Parts : New in SSRS 2008 R2
There is a good preliminary documentation on building Report Parts in MSDN:
Publishing Report Parts in Report Builder 3.0 – http://msdn.microsoft.com/en-us/library/ee633670%28v=SQL.105%29.aspx
The Good
As per the MSDN documentation, it’s good to know that the following items can now be “reused” across different reports:
• Charts
• Gauges
• Images
• Maps
• Parameters
• Rectangles
• Tables
• Matrices
• Lists
The Not-So-Good-Yet
It seems very limiting to me, though, that Report Parts can only be created/published from Report Builder 3.0. As someone who works almost 100% using BIDS, I think having to switch tools to just be able to publish a report part will definitely affect my report writing momentum. And by switching tools I mean, creating the report in BIDS, deploying to the Report Server, navigating to that site, and then editing that report in Report Builder 3.0. That’s quite a few extra steps …
Also, I would have loved to be able to publish a report header and footer as report parts. Unfortunately the current CTP version does not support it.
Creating your first Report Part
Download document/screenshots: Exploring SSRS 2008 R2 Report Builder 3.0 – Report Parts
For this mini tutorial I am going to assume you have created your report in BIDS 2008.
1. Deploy your report to the report server.
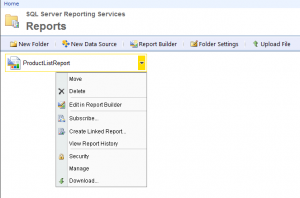
2. Go to that report. Hover over the report name, and click on the down arrow to reveal the contextual dropdown. Select Edit in Report Builder
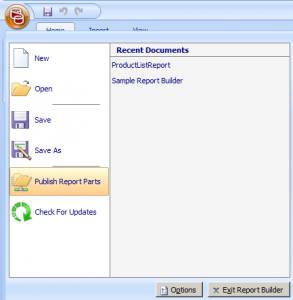
3. Once Report Builder opens, go to the Report Builder main button (I think it looks like a scroll), and select Publish Report Parts.
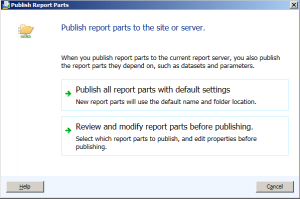
4. In the Publish Report Parts window, select Review and modify report parts before publishing (unless you really want to publish all report parts with default settings)
5. In the next window, select which Report Parts you want to publish. Put a description too, makes it easier for your Report Builder users to identify report parts later on.
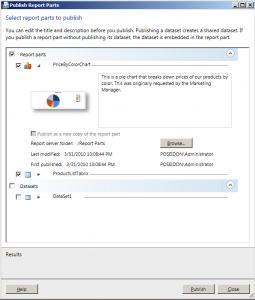
6. When you’re done, click on Publish. Note there is no dialog box notifying you that publishing is done. All you get are the green checkmarks beside the report parts you selected, and the message at the bottom of the Publish Report Parts dialog box saying how many report parts were published, and how many failed.
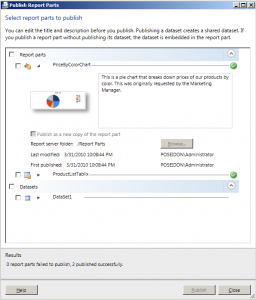
7. If this is the first time you published a Report Part, a new Report Part folder will be created in your report server.

8. Inside the Report Part folder are your published report parts. Note that the icon of the report parts give it away – puzzle pieces! Also note that when you hover over a report part and click on the down arrow, you will reveal the contextual menu for a report part (move, delete, security, manage and download).
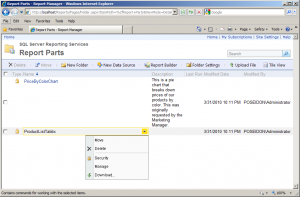
That’s it! That’s how you publish your report parts using Report Builder 3.0! Pretty nifty, eh?
Report Part Gallery
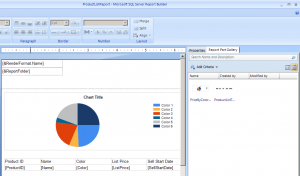
Inside the Report Builder 3.0, you will also see the Report Part Gallery tab, which will list all available Report Parts you can add to your report.
Report Part Updates
It is also important to note that if any report parts get updated, the reports that use that report part will display a notice when opened in Report Builder. It will tell you that the published report part(s) have been updated on the server.
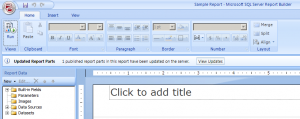
Once you choose to view changes, you can select which report parts you want to update.
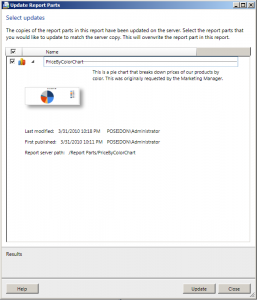
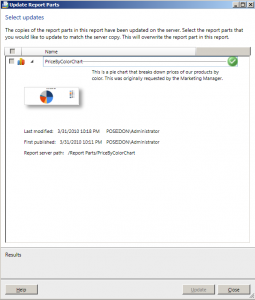
And once it’s updated, no in-your-face notice again that the update was successful. It’s still just that subtle green checkmark beside the report part you chose to update.
Download document/screenshots: Exploring SSRS 2008 R2 Report Builder 3.0 – Report Parts
VN:F [1.9.22_1171]
Rating: 8.5/10 (28 votes cast)
VN:F [1.9.22_1171]
Rating: +1 (from 3 votes)
