Archive for the ‘ Tutorials ’ Category

This is an expansion (and slight variation) of Joe’s answer in StackOverflow regarding the thread Find the maximum consecutive years for each ID’s in a table (Oracle SQL) using SQL Server. I’ve tested this in SQL Server 2014, but should work from SQL Server 2005 onwards where the ranking functions are supported.

The problem Joe solved is not uncommon – i.e. how to get the consecutive years of something (consecutive year sales, consecutive years in school, consecutive years volunteering etc), and his solution is pretty clever.

Let’s assume you are working on a sales database. You have multiple clients who could be purchasing from your store several times a year, or a couple of times every five years. You may want to know what’s the maximum consecutive years they’ve purchased from you. Why? Perhaps in a marketing campaign, you may want to give your loyal customers (purchased in 5 or more consecutive years) a special discount.

Your data may look like the following screenshot. Notice that in this example, Client 00001, 00002 and 00003 purchased only once. Client 00004 purchased several times, and it looks like there were purchases in consecutive years.

See full article here at sqlbelle.com

VN:F [1.9.22_1171]
Rating: 9.3/10 (3 votes cast)
VN:F [1.9.22_1171]
Rating: 0 (from 2 votes)

Discovering SSRS Report Parameters using PowerShell

We can use PowerShell to discover many SSRS properties, including the different parameters available in a report. This blog post is based on SQL Server 2014 and PowerShell V5.

The example report utilizes different variations of parameters. In the example, Customer ID is an integer. Order Date From and To are dates. Online Flag is a boolean. Min Total Due is a float. Status is a multi-value text.

Additional properties can be found in the Report Parameter window, including whether the parameter is nullable, if it’s multivalued, or if it’s visible or hidden, etc.

To do this in PowerShell, the first thing to do is to add the assembly that will allow us to create the ReportViewer object. Note that the version and public key token are specified, so check the version you have on your machine to ensure the accuracy.

See full blog post here

VN:F [1.9.22_1171]
Rating: 10.0/10 (1 vote cast)
VN:F [1.9.22_1171]
Rating: 0 (from 0 votes)

Demystifying T-SQL Subqueries–Part II

In the last post (Demystifying T-SQL Subqueries – Part I) we looked at how to use scalar subqueries. Let’s continue our subquery adventure.

As with Part I, the following T-SQL query samples are using the Chinook database.

Subqueries which return a single list of values

Result

Description

Sample

B

Single Column
or Column List
or Single List of Values

clip_image004_thumb

Read the rest of this entry »

VN:F [1.9.22_1171]
Rating: 9.8/10 (9 votes cast)
VN:F [1.9.22_1171]
Rating: +3 (from 3 votes)

Demystifying T-SQL Subqueries–Part I

When I teach SQL Server Development/T-SQL courses, subqueries is usually one of those topics that students find confusing. Usually it’s a head scratcher, although there are some who just get it.

So let’s try to demystify subqueries.

Very simply put, a subquery is just a query within a query. It’s a SELECT inside another SELECT.

Now let’s break it down. Let’s start with understanding what a query gives you first.

Understanding results of regular queries

Before we can understand subqueries, we need to understand first the different results we get from regular queries. A regular query always results in a dataset. It gives you the following variations of results:

Result

Description

Sample

A

Scalar Value

subquery that returns scalar value

B

Single Column
or Column List
or Single List of Values

subquery that returns a list (single column) of values

C

Table

subquery that returns a table

Read the rest of this entry »

VN:F [1.9.22_1171]
Rating: 8.3/10 (10 votes cast)
VN:F [1.9.22_1171]
Rating: 0 (from 2 votes)

Transfer data from MySQL to SQL Server Using SSIS

I will be doing a series of tutorials (some simple, some more involved) in SSIS in the next little while. In addition to step by step instructions, I will also be providing the video tutorial equivalents which will be posted at the Black Ninja Software website. Once the video tutorials are up, I will be updating the individual links.

Now for this simple problem. You have a MySQL database, and you want to be able to dump data from it to SQL Server using SSIS.

Here are the steps:

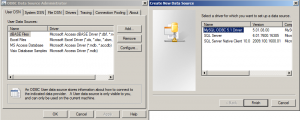
1. If you haven’t already, download and install MySQL Connector for ODBC.

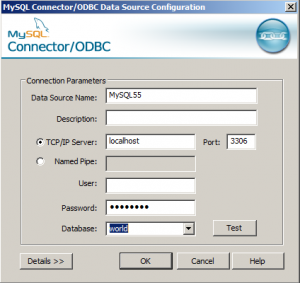
2. Create a DSN for your MySQL

a. Go to Start > Administrative Tools > Data Sources (ODBC)
b. Create a new User DSN (in my case I called it MySQL55)


Read the rest of this entry »

VN:F [1.9.22_1171]
Rating: 9.5/10 (4 votes cast)
VN:F [1.9.22_1171]
Rating: +5 (from 5 votes)

Resizing your VMWare Disk in 12 Steps

Every now and then I need to resize my VMWare Server disks.

The is the easiest and least troublesome way, from my experience, is to use GParted Live (Gnome Partition Editor)

Prep Work:

1. Download GParted (Gnome Partition Editor) Live (http://sourceforge.net/projects/gparted/files/gparted-live-stable/). It is an iso file that we will mount to our vm

2. Locate where your vmware-vdiskmanager.exe is. It would typically reside in the install folder, for example:

 C:Program Files (x86)VMwareVMware Servervmware-vdiskmanager.exe

3. Note the path to your virtual disk (vmdk). For example:

 vmware-vdiskmanager.exe -x 20GB "C:Virtual MachinesSQL2005SP3
  Windows Server 2003 Enterprise EditionWindows Server 2003 Enterprise Edition.vmdk"

Ready to resize your VMWare disk? Let’s go:

1. Shut down your VM
2. Open the Command Prompt
3. Go to the folder where you have your vmware-vdiskmanager.exe is (or if you have added this to your PATH, then it doesn’t matter from which path you execute it from).

 cd C:Program Files (x86)VMwareVMware Server

4. Resize your disk. For example if you want to resize your disk from 10GB to 20GB:

 vmware-vdiskmanager.exe -x 20GB "C:Virtual MachinesSQL2005SP3
  Windows Server 2003 Enterprise EditionWindows Server 2003 Enterprise Edition.vmdk"

5. Confirm that your VM disk size has been changed, before we resize your partition

  1. Power up your VM
  2. Go to Administrative Tools > Computer Management > Disk Management
  3. Check how much space you have in your disk. You should see an extra 10GB unallocated

6. Shut down your VM again.

7. In your VMWare web access, select your VM.

8. Mount the GParted Live ISO

  1. In the Hardware section, select “CD/DVD Drive”
  2. Select the dropdown arrow, then click Edit
  3. In the Window that appears, select Host Media, and under Connection section select ISO image. Navigate to the GParted Live ISO location, and then save your preferences.

9. Configure your VM to boot from CD/DVD

  1. Configure VM on the right hand panel
  2. In the popup window that appears, go to the Power tab.
  3. Go to the BIOS Setup section, and check “Enter the BIOS setup screen the next time this virtual machine boots” and save your preferences.

10. Restart your VM

11. Resize your partition using GPartLive

  1. Follow the screens, and select appropriate options if prompted (i usually select defaults) ex:
    language           US English
    keyboard          qwerty/us.map
    video driver    generic
    resolution        1024X768
  2. When the partition editor appears, you will see a partition named /dev/sda1
  3. Click on Resize/Move button above the partition list
  4. The /dev/sda1 becomes a movable slider. Drag the slider (make sure it’s double arrow, not four way arrow) all the way to the end of the partition. The double arrow is a “resize” operation, while the four way arrow is a “move” operation.
  5. When done, click Apply.
  6. When resize operation is complete, click Close.
  7. Click the “Power” button, and choose to reboot.

12. When your VM starts up, it will prompt you to do a checkdisk. Let this finish. You will be prompted to reboot (yet again). Reboot – do not resist :)

Last Check

Now, when your VM starts up again, check your disk to confirm additional space has been allocated:

  1. a. Go to Administrative Tools > Computer Management > Disk Management
  2. b. Check your Primary Partion. Check that the new size is correct, and that there is no unallocated space

That’s it, we’re done.

VN:F [1.9.22_1171]
Rating: 10.0/10 (10 votes cast)
VN:F [1.9.22_1171]
Rating: +1 (from 1 vote)

Step by Step Guide to Creating a SQL Server VM Using VMWare

Download PDF file

I typically use SQL Server VMs for my development and administration classes. I want the students to have full autonomy over the machines they are using, so that they can try out different features and configurations without worrying about wrecking a whole lab machine.

This tutorial steps the students through how to create and configure their own standalone SQL Server VMs. We will be using:

· VMWare Server

· Windows Server 2008

· SQL Server 2008

Terms

A few terms to familiarize yourselves with before we start:

Virtual Machine (VM) This is essentially a standalone computer installed within another platform/OS.

A virtual machine is also sometimes called a guest machine. This typically provides a complete system platform with its own set of operating system, hardware configurations, and installed software packages, but still runs on top of a “host” machine which has the main OS, and the physical hardware.

There are different applications that can create and run virtual machines:

VMware Server
MS Virtual Server

MS Virtual PC

Virtual Box

ISO file This is a disk image, an archive file of an optical disc in a format defined by the International Organization for Standardization (ISO). This contains archived CD/DVD content, and you can point your VM to an ISO file to read or use the content.

You can create ISO files using any CD/DVD image file processing tool, like:

PowerISO

MagicISO

FreeISO Creator
Nero Burning Software

Prep Work

1. Download and install VMWare Server (http://www.vmware.com/products/server/)

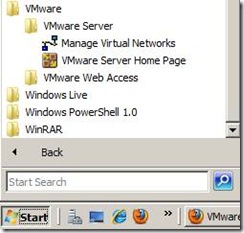
You will need to register, and get the serial number for your free VMWare Server. Once it’s installed, you should have a link to VMWare Server Home Page from your Start > Programs menu.

clip_image002

2. Get your media for :

· your operating system (ex Windows Server 2008)

· SQL Server (up to you which version you want to install)

or better yet, or if you have MSDN/MSDNAA/Technet Subscriptions, download it from the Microsoft Site. If there is an option to download an .iso file, download the .iso file. Otherwise you will need to create this yourself later.

Read the rest of this entry »

VN:F [1.9.22_1171]
Rating: 10.0/10 (9 votes cast)
VN:F [1.9.22_1171]
Rating: 0 (from 0 votes)

To view your SQL Server (or SSRS) reports using PowerShell, you can either use

  • plain browser + URL string combo
  • Report Viewer
  • Web Services

The script below shows the first two options.
If you are going to go with Report Viewer (and personally, that’s my preference), you will need to download the ReportViewer redistributable package

  • Report Viewer Redistributable 2005 SP1
  • Report Viewer Redistributable 2008 SP1

One of these days I will hammer through the Web Services option, and also play more with what can be done with Report Viewer. And when I have good demos, I definitely will post them here :)

#==============================================================
#VANPASS August 2009
#PowerShell and SSRS (SQL Server Reporting Services)
#Donabel Santos
#http://www.sqlmusings.com / http://www.twitter.com/sqlbelle
#==============================================================
 
#--------------------------------------------------------------
#Approach 1: simplistic approach - accessing report via URL
#--------------------------------------------------------------
Set-Alias ie "$env:programfilesInternet Exploreriexplore.exe"
 
#note you can control how the report is rendered via the parameters in the URL string
ie "http://localhost/ReportServer/Pages/ReportViewer.aspx?%2fReports%2fSample+Report&rs:Command=Render"
 
 
#--------------------------------------------------------------
#Approach 2: using the ReportViewer
#You need to download the ReportViewer redistributable package
#--------------------------------------------------------------
#I am qualifying this because I have more than one version in my system
#If you need webforms, use Microsoft.ReportViewer.WebForms
[void] [System.Reflection.Assembly]::Load("Microsoft.ReportViewer.WinForms, `
	Version=9.0.0.0, Culture=neutral, `
	PublicKeyToken=b03f5f7f11d50a3a")
 
#Windows.Forms for viewing dialog box
[void][System.Reflection.Assembly]::LoadWithPartialName("System.Windows.Forms")
 
#System.IO because I want to export to Excel
[void][System.Reflection.Assembly]::LoadWithPartialName("System.IO")
 
#System.IO because I want to open Acrobat
[void][System.Reflection.Assembly]::LoadWithPartialName("System.Diagnostics")
 
#for credentials, if needed
[void][System.Reflection.Assembly]::LoadWithPartialName("System.Net")
 
$rv = New-Object Microsoft.Reporting.WinForms.ReportViewer;
$rv.ProcessingMode = "Remote";
$rv.ServerReport.ReportServerUrl = "http://localhost/reportserver";
$rv.ServerReport.ReportPath = "/Reports/Sample Report";
 
#if you need to provide basic credentials, use the following
#$rv.ServerReport.ReportServerCredentials.NetworkCredentials= 
#	New-Object System.Net.NetworkCredential("myuser", "mypassword");
 
$rv.Height = 600;
$rv.Width = 800;
$rv.RefreshReport();
 
#--------------------------------------------------------------
#Show as Dialog Using Windows Form
#--------------------------------------------------------------
#create a new form
$form = New-Object Windows.Forms.Form;
 
#we're going to make it just slightly bigger than 
$form.Height = 610;
$form.Width= 810;
$form.Controls.Add($rv);
$rv.Show();
$form.ShowDialog();
 
#--------------------------------------------------------------
#Export to Excel
#--------------------------------------------------------------
#now let's try exporting to Excel
$mimeType = $null;
$encoding = $null;
$extension = $null;
$streamids = $null;
$warnings = $null;
 
$bytes = $rv.ServerReport.Render("Excel", $null, 
                                [ref] $mimeType, 
                                [ref] $encoding, 
				[ref] $extension, 
				[ref] $streamids, 
				[ref] $warnings);
$file = "C:VANPASSsamplereport.xls";
$fileStream = New-Object System.IO.FileStream($file, 
              [System.IO.FileMode]::OpenOrCreate);
$fileStream.Write($bytes, 0, $bytes.Length);
$fileStream.Close();
 
#let's open up our excel application
$excel = New-Object -comObject Excel.Application
$excel.visible = $true;
$excel.Workbooks.Open($file) | Out-Null;
 
#--------------------------------------------------------------
#Export to PDF
#--------------------------------------------------------------
$bytes = $rv.ServerReport.Render("PDF", $null, 
                                [ref] $mimeType, 
                                [ref] $encoding, 
				[ref] $extension, 
				[ref] $streamids, 
				[ref] $warnings);
$file2 = "C:VANPASSsamplereport.pdf";
$fileStream = New-Object System.IO.FileStream($file2, 
             [System.IO.FileMode]::OpenOrCreate);
$fileStream.Write($bytes, 0, $bytes.Length);
$fileStream.Close();
[System.Diagnostics.Process]::Start($file2)
 
 
#--------------------------------------------------------------
#Other ways to render or access your reports:
#SSRS Web Services
#--------------------------------------------------------------
VN:F [1.9.22_1171]
Rating: 10.0/10 (12 votes cast)
VN:F [1.9.22_1171]
Rating: 0 (from 0 votes)
`